SHIPPING METHODS
Shipping can be a costly venture. My experience has been that companies like UPS and FED EX are good for smaller and lighter package shipping but very expensive when shipping something the size and weight of an engine. Plus, there is usually a weight restriction.
Trucking companies, common carriers, will ship almost any sized package regardless of the weight but can be very costly. I have made contact with a couple of these carriers and was told it would cost $435 and up to ship an engine. This cost is prohibitive for most people.
My first choice in shipping is Fastenal 3rd Party Logistics (Blue Lane Freight). They are very reasonably priced, and fast. The engine must be in a wood box on a pallet. Costs through Fastenal have been less than $175 to most areas on the East coast. Since COVID, areas on the West coast are restricted and/or part of the trip a common carrier is used; so, costs to the West have been a little higher. Hopefully, all West coast shipping will get back to normal and as comparatively priced as the East coast.
My second choice is to arrange shipping through Freight Center (freightcenter.com). They will find the best pricing (usually under $300) and shipping company for your area, do all the paperwork, and they make all the arrangements.
HOW TO CRATE A MG/Triumph 1500 ENGINE FOR SHIPPING
|
1. Start with an empty pallet. Most lumber yards have pallets that they will give you.
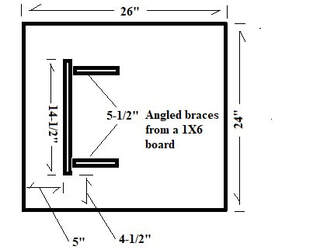
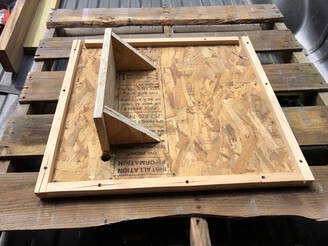
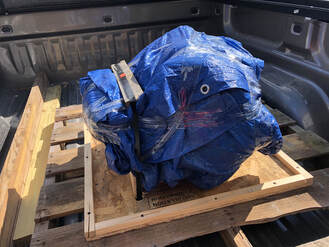
2. Build the bottom of the box. a. I start with a 24"X26" piece of 1/2" plywood or 7/16" OSB. b. Next, I cut a 14-1/2" long piece of a 1X6 board. Fasten this in an upright position to the bottom piece by driving 2" screws up from the bottom. (See the diagram and pictures). Fasten the bottom piece to the pallet with 1" screws. c. Cut 2 braces at a 45 degree angle from a 1X6 board and use them to brace the 14-1/2" board. d. Cut strips of the 1X6 to 3/4" wide and screw these pieces all the way around the bottom piece. e. Drill a 1" hole at each end of the upright board. 3. Position and prepare the engine. a. Lay out the plastic or tarp that you are going to wrap around the engine over the pallet and bottom piece. b. Place the engine in position. The engine should lay on its side with the exhaust/intake ports facing down across the length of the upright board fastened to the bottom piece. I leave at least 4 studs in the head, 2 will go on the one side of the upright board and 2 on the other side.) c. Wrap the engine up in the plastic or tarp and secure this with packing tape. 4. Feed a tie down strap (or take it to a place that has a bander, like I did) through the holes and around the top of the engine making a complete loop. Ratchet the strap tight around the engine head only. 5. Build the outsides of the box. a. Cut 2 - 24"X17" pieces out of the plywood or OSB and 2 - 27"X17" pieces out. b. Fasten the 2 - 24" pieces to opposites ends of the bottom piece on the pallet by driving 1" screws through the plywood and into the 3/4" wood strips on the bottom piece. c. Cut and fasten 3/4" strips to surround both of the 24" end pieces. d. Fasten the 2- 27" pieces on each side with 1" screws along the bottom and up the 2 sides of both pieces. (This should make a complete wrap around the engine without a top. 6. Make the top of the box. a. Cut a 25"X27" piece of OSB or plywood for the top. b. But before you put the top on, cut 2 - 24" pieces of 2X4 and fasten them approx. 5" in from each end with 2" screws. (These 2X4s will keep the box from being crushed when you tighten down the straps shown in the picture.) c. Put the top piece on and screw it down to the 3/4" strips along the ends and to the 2X4 pieces with 1" screws. d. Using 2 - 1" tie down straps (or banding straps) wrap the straps around the box and the slats of the pallet. Cinch the straps down tight. Done! |

|
